Project Start and Overview
Start Docker:
- Linux: Docker will start automatically after the computer starts
- Docker for Windows: start Docker by clicking on the Docker icon (in ‘Programs’) – wait until “Docker is running” pops up
- Docker Toolbox: open the Docker QuickStart terminal and wait until “Docker is configured to use default machine…” pops up
Start OCR4all:
- Linux: open the terminal, type in
docker start -ia ocr4all, press 'enter' and wait for the server to start - Windows 10 (Home, Pro, Enterprise, Education): open Windows PowerShell, type in
docker start -ia ocr4all, press 'enter' and wait for the server to start - Older Versions of Windows (with Docker Toolbox): open the Docker QuickStart terminal and wait until “Docker is configured to use default machine…” pops up
After this initial installation, you will be able to easily access OCR4all in your browser, respectively under:
- Linux, Docker for Windows, macOS:
http://localhost:1476/ocr4all/ - Docker Toolbox:
http://192.168.99.100:1476/ocr4all/
Once OCR4all has been opened in a browser, the user will automatically land on the 'Project Overview' starting page. From there, they will be able to access several features:
- 'Settings': This feature allows for selecting the book set to be worked on, which can be chosen from the dropdown menu found under ‘Project selection’ – the title having been previously saved as a folder under ocr4all/data/book title (see 1.2). Additionally, the ‘gray’ setting must be selected under the menu point ‘Project image type’.
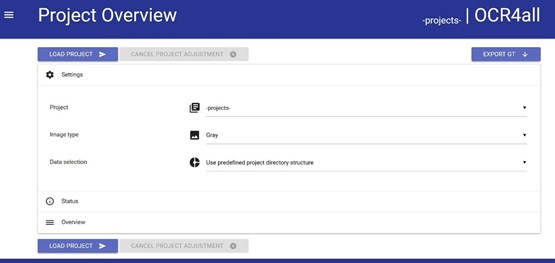
fig. 2: Project Overview settings.
Following this initial set up, click on ‘load project’ in order for the book in question to be uploaded to the OCR4all platform. Seeing as OCR4all only accepts certain file designations and formats (i.e. 0001.png etc.), a data conversion might be requested which can be directly carried out in OCR4all (fig. 3).
It is irrelevant whether a PDF or individual images were placed in the 'input' folder. If possible, however, single images are usually preferred.

fig. 3. Data conversion request (i.g. PDF in 'input' folder).
In OCR4all, all data generated during the workflow and for its functioning are saved in a single PAGE XML file per scan page and are no longer kept in the form of many individual files. If project data from previous versions is still available, it is now possible to convert the project automatically into the structure required by OCR4all.
The feature "Overview" provides the user with a tabular presentation of the project’s ongoing progress (fig. 4). Each row corresponds to an individual book page, labelled by a page identifier (far left column). The following columns illustrate, from left to right, the workflow’s progression. Once a particular step has been executed, it will appear as completed (green check mark) in that work stage’s specific column.
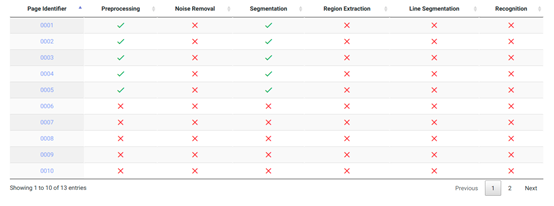
fig. 4: Overview.
Clicking on an individual page’s identifier enables the user to check on the state of that specific page’s processing, as well as on the data generated by it, at any time during the workflow. To this effect, please use the ‘images’ column, as well as the subsequent options: ‘original’, ‘binary’, ‘gray’ and ‘noise removal’.
With the button "Export GT" (top right) all data created in the course of the project can be exported and packed as a zip folder within 'data'.